Myschools Software
School Management and Student Information System
User Training Manual
For use;
Primary, Secondary and Senior schools
Contents
Task 1: Open / Sign up for a New School Account;
Task 1: Login / Signin process;
C: SCHOOL ACCOUNT SET UP PROCESS
Task 1: Class Information Set up
Task 4: User accounts Management
Task 9: Set advance pay limit for employees
Task 10: Set student promotion criteria for end of term reports
Task 11: Set Head teacher’s signature
Task 13: View school account Information
Task 1: Add New student using Web forms
Task 2: Add New student using Ms Excel
Task 3: Delete / Transfer student(s) from one Class / Stream/ Year / Term to another
Task 5: Search / Edit student Bio data
Task 7: Student Promotion to another Class.
Task 1: Add New Staff using Web forms
Task 2: View current Staff Information
Task 2: Edit / Delete Marks / Add New comment
Task 4: Student report card Download
G. STUDENT FEES PAYMENT MANAGEMENT
Task 2: View fees payment reports;
Task 2: Add Income from other sources
Task 1: How to set up a time table?
Task 2; School / Staff time table generator
I. SMS AND EMAIL COMMUNICATION
Task 4: Manage fees collection:
Task 5: Download Financial reports
Task 6: Prepare School time table
A: NEW SCHOOL ACCOUNT
Task 1: Open / Sign up for a New School Account;
This is applicant to a new school, taking on Myschools
1. Go in your browser, Type URL: jsmis.jotellug.com
2. Click on the Sign up button below located just in the middle of the home page.
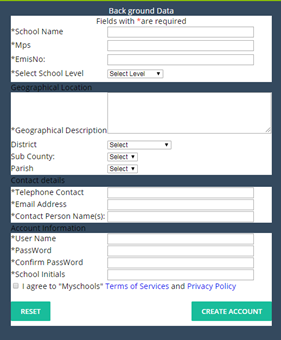
3. Fill the online form
4. Check email for activation purpose
B. SIGNIN / LOGIN PROCESS
Task 1: Login / Signin process;
1.
![]() Click on Login button
Click on Login button
2.
 Type in Correct Username,
School Id and Password
Type in Correct Username,
School Id and Password
3. Depending on username level, specific home page will redirected.
C: SCHOOL ACCOUNT SET UP PROCESS
1.
![]() On the
menu bar, Move mouse on signup button
On the
menu bar, Move mouse on signup button
2. Drop down list is generated.
Task 1: Class Information Set up
1.
![]() Left click
on
Left click
on
2. To add New class use New Class button
3. To add stream to class Use New Stream button
4. To add New House ; New class -à New House
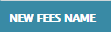 Task 2: New Fees Name
1. Left click on
2. Type in New fees Name
 Tag amount to fees
names
Tag amount to fees
names
Menu bar -> FINANCE -> Drop down menu -> Left Click
1. Select Year -> Term -> SUBMIT
2. You can Reset / add other fees / Non cash payments / Collect fees balances from previous terms
3. Click Add New to add new fees structure
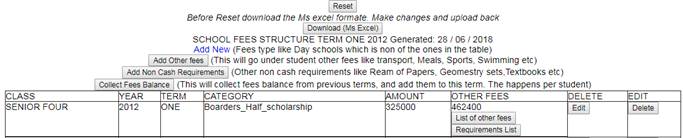
4. Add New -> Select Level -> Class -> Stream -> Year -> Term
5. Tick -> type Amount
6. Select mode of application -> POST
7. You Edit / Delete fees
Task 3: New Subject Name 
1. Left click on
2. Type in New Subject Name, Total No of papers and examinable papers, and select level
 Task 4: User accounts Management
1. Left click
2. Enter New user account, and decide levels for them
3. Search for a user
4. Delete / Deactivate user account
5. Change / Modify User password
Task 5: New comments Manager
1.
![]() Left click
Left click
2. Click New comment or Edit / Delete to modify existing comments
 Task 6: Grade set up
1. Left click
2. Select Level -> Class -> Year -> Stream
3. Query Grades
4. You add New Grade or Edit / Delete existing grades
 Task 7: Grade set up
1. Left click
2. You can add New Exam or Edit / Delete existing exams
 Task 8: Time table
set up
Task 8: Time table
set up
1. Left click
2. Select Level -> Class -> Year -> Stream
3. Query TIME TABLE WIZARD button
4. Select week days
5. Select order of colors
6. Click Post button
7. Repeat the 1 to 6 for the rest of the groups
Task 9: Set advance pay limit for employees
1.
![]() Left click
Left click
2. Key in amount in % e.g 10% of the employee net pay
3. Click Post
Task 10: Set student promotion criteria for end of term reports
1.
![]() Left click
Left click
2. Click New -> Key in new value below 100 or Edit / Delete X existing
 Task 11: Set Head
teacher’s signature
Task 11: Set Head
teacher’s signature
1. Left click
2. Choose File -> Upload
3. Change / Delete existing signature
Task 12: Set Term dates
1.
![]() Left click
Left click
2. Select Term -> Year -> Beginning Date -> end Date - > Save
3. Edit / Delete existing
 Task 13: View school
account Information
Task 13: View school
account Information
1. Left click
D. STUDENT MANAGEMENT
Menu bar -> STUDENT
 Task 1: Add New
student using Web forms
Task 1: Add New
student using Web forms
1. Left click
2. Fill the online form -> submit
 Task 2: Add New
student using Ms Excel
Task 2: Add New
student using Ms Excel
1. Left click
2. Select Level -> Class -> Stream -> Year -> Term -> Next
3. Download ADMISSION TEMPLATE
4. Populate template with New student data
5. Select House
6. Click Upload
 Task 3: Delete /
Transfer student(s) from one Class / Stream/ Year / Term to another
Task 3: Delete /
Transfer student(s) from one Class / Stream/ Year / Term to another
1. Left click
2. Select Level -> Class -> Stream -> Year -> Term -> Query Student Records
3. Tick student whose records you want to transfer / Delete from the system
4. Select the choice of action Transfer / Delete
Task 4: Change student Number
1.
![]() Left click
to use Ms Excel template. I deal for many records
Left click
to use Ms Excel template. I deal for many records
2.
![]() Or left click to
use web forms. Ideal for one record or a few records.
Or left click to
use web forms. Ideal for one record or a few records.
3. Or Student Number -> Student Ledge click Change
 Task 5: Search /
Edit student Bio data
Task 5: Search /
Edit student Bio data
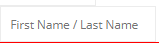
1. Enter student First Name OR Last Name in the text field
located just below the menu bar
2. Click Query student Ledge -> Student Bio data
3. Do the required changes -> Click Save changes
4.
![]() Use student Number to view student
Information
Use student Number to view student
Information
Task 6: Student Report Down
Select Level -> Class -> Stream -> Year -> Term -> QUERY CLASS PAGE
1. Class List Download
Task 7: Student Promotion to another Class
1. See Data entry Section – Add student to Class
Promote one / a few students – Use web form
2.
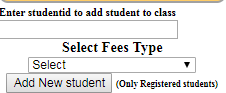 Type student Number – Select Fees
Type
Type student Number – Select Fees
Type
Promote many students – Use Ms Excel
3. Prepare Ms Excel promotion sheet
1) Class List Download ->Save as XML Spread sheet 2003
2) Delete / Add student Numbers
4.
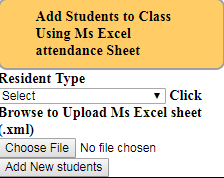 Select Resident Type – Choose File –
Add New Students
Select Resident Type – Choose File –
Add New Students
E. STAFF MANAGEMENT
Menu bar -> STAFF
Task 1: Add New Staff using Web forms
1.
![]() Left click
Left click
2. Fill the online form -> submit
 Task 2: View current
Staff Information
Task 2: View current
Staff Information
1. Left click
2. Navigate Payment history / pay / Edit bio data
 |
3. Use to generate full
 Staff report in Ms Excel.
F. STUDENT MARKS MANAGEMENT
Menu bar -> CLASS -> Select Level choice
Select Level -> Class -> Stream -> Year -> Term -> QUERY CLASS PAGE
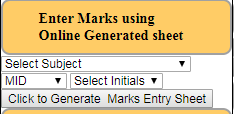
Task 1: Enter Marks
1. Web form – Select Subject -> Exam - > Teacher Initials -> Generate Marks Entry Sheet
 |
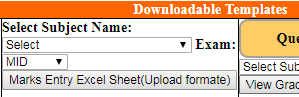
2. Download Ms Excel template containing student details from Downloadable template
 |
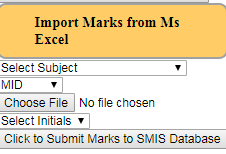
Import Marks from Ms Excel – Select Subject -> Exam - > Teacher Initials -> choose file -> Submit marks to SMIS Database
Task 2: Edit / Delete Marks / Add New comment
Select Level -> Class -> Stream -> Year -> Term -> QUERY CLASS PAGE
1. Web form – Select Subject -> Exam - > Teacher Initials -> Generate Marks Entry Sheet
|
2. Left click Edit / Delete -> Delete existing -> Submit
3. Enter New marks > Save
4.
![]() Enter New comment
Enter New comment
5.
![]() Reset Marks Deletes
all the marks for the class in question
Reset Marks Deletes
all the marks for the class in question
Task 3: Class Marks Reports
Select Level -> Class -> Stream -> Year -> Term -> QUERY CLASS PAGE
1. Select exam type – Class Marksheet download
2. Select exam type – Exam summary analysis sheet Download
3. Subject Marksheet
Task 4: Student report card Download
One Exam
1) Download reports - Select Exam type – Download
Two Exams – combined by Exam weights – See system set up
 Select choice report cards
G. STUDENT FEES PAYMENT MANAGEMENT
Task 1: Enter New Receipt –
1. See search for student -> Enter Balance
2. Enter amount -> Date of payment -> Bank Account -> Receipt number -> Reason for Payment
3. POST fees
This action will automatically communicate to parent / Student via email or sms phone
![]() Add more fees to student (Arrears / penalties / Discounts)
Add more fees to student (Arrears / penalties / Discounts)
4. Debt this student
Task 2: View fees payment reports;
Class reports
![]() Select Level -> Class -> Stream -> Year -> Term
-> QUERY CLASS PAGE
Select Level -> Class -> Stream -> Year -> Term
-> QUERY CLASS PAGE
5. Reports -> Select ->
Task 3: Student Reports
6. See search for student -> student payment statement / Bank payment slip / List of student other fees / Non cash payments /
 H.
SCHOOL FINANCE MANAGEMENT
H.
SCHOOL FINANCE MANAGEMENT
1. Home page -> Left click Finance
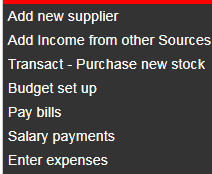 |
Task 1: Add New supplier
2. Left click Add New supplier
3. Fill form - > OK
Task 2: Add Income from other sources
4. Fill form - > POST
Task 3: Purchase new stock
5. Fill form - > SUBMIT
Task 4: Budget set up
6. Type Finance Year e.g -> Select Quarter / Term
Task 5: Pay Bills
7. Left click Pay bills -> Type Reference Number -> Click to view Bills
8. List of transactions -> Pay/ Delete transaction
Task 6: Salary Payments
9. Left click Salary payments -> List of valid staff -> Payment History / Pay / Edit
10. Generate pay roll
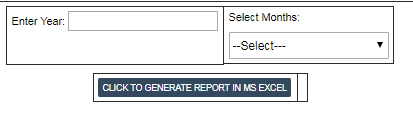
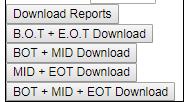
Task 7: Financial reports
Click on each of the links to view report
1.
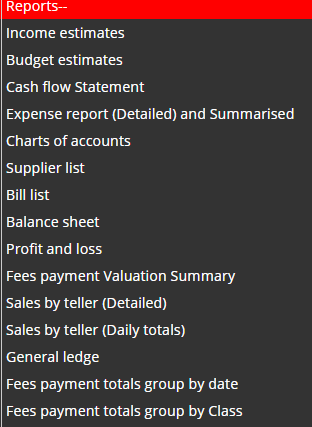 Reports ->
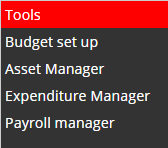
Finance module tools;
Task 9: Budget set
1. Budget set – Similar to Budget set up above
Asset Manager
New Asset
2. Fill the New asset form
Task 10 : Asset manager :
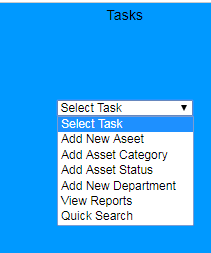
1.
Add new asset - > Fill form -> Submit
2. Add Asset category -> Fill form -> submit
3. Add Asset Status -> Fill form -> submit
4. Add New Department -> Fill form -> submit
5. View Reports
6. Quick search as asset
Task 11: Expense Manager
1. Left click Expense manager
2.
Click ![]() to add Expense field
to add Expense field
3. Fill form –> Submit
Task – Similar Asset manager
Task 12: Payroll Manager
1. Left click Payroll Manager
2. Select -> Month -> Type Year e.g 2012 -> Query Payroll
I. TIME TABLE MANAGER
 Home page -> Left click
1. Select Level -> Class -> Stream -> Year -> Term -> QUERY TIME TABLE WIZARD
2. Edit / Delete / Reset Time table variables
Task 1: How to set up a time table?
Menu bar - > TIME TABLE -> TIME TABLE SET UP -> Similar to TIME TABLE SET UP
Task 2; School / Staff time table generator
1. TIME TABLE -> SCHOOL TIME TABLE GENERATOR
2. TIME TABLE -> STAFF TIME TABLE GENERATOR
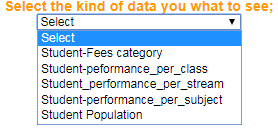
J. GRAPH GENERATION PROCESS
Menu Bar -> Graph reports ->
1. Left click Student Select Level -> Class -> Year -> Term -> Next
2. Select Type of data you what to represent on the graphs.
 |
I. SMS AND EMAIL COMMUNICATION
Task 1: Menu Bar -> SMS messenger ->
1. Customized SMS for schools
2. Top up / add credit to the school account
3. Send customized SMS to parents
4. Send customized fees payment notifications
5. Sent Msgs
6. Transaction History
Task 12: SMS for General use
7. Left click SMS for General use
8. Type / paste contents -> Message -> Send id -> Send to all
EXERCISE
Task 1: View student records;
1. Start your browser
2. Address bar: Type jsmis.jotellug.com
3. Enter login details: Username: user1 Schoolid: 6WSSS2014 Password: 123
4. Main Menu: Class > O-Level
5. Select: Level: O-Level Class: Senior One Stream: East: Year: 2018 Term: One
Click - Next
6. Down Class List (Ms Excel)
7. Prepare list
8. Add list to: O-Level Class: Senior One Stream: East: Year: 2018 Term: Two
9. View class page : O-Level Class: Senior One Stream: East: Year: 2018 Term: Two
Task 2: Enter Marks
1. Set Grades and Exams weights
2. Download marks entry sheet
Group 1: Mathematics, English
Group 2: History, Geography
Group 3: CRE, Physics
Group 4: Computer Studies, Biology
Group 5: Chemistry, Islamic Education
3. Enter marks for each subject on Sheet 1
4. Upload marks from Ms Excel
Task 3: View reports
5. Download Class marksheet
6. Download Analysed marks sheet
7. View Graphs
Task 4: Manage fees collection:
1. Enter receipts on sheet 3
2. Edit / delete receipts
3. View Student other fees, Debt Student, Add Non Cash requirements
Task 5: Download Financial reports
1. Fees payment lists per class, per stream,
2. Income statement
3. Student Financial Statements
4. Cash flow statement, Profit and Loss, Fees payment Evaluation Summery, Sales by teller (Detailed and Daily)
Task 6: Prepare School time table
1. Download report form – All school, Class, Stream and Person
2. Manage teacher load